Thursday, August 14, 2008

Renovation in progress ;-)

I am in the midst of 'renovating' this site. You may find some of the list of my previous entries on the right missing. I apologize about that as I am now sorting them out. The site should be completed in the next few days.
Thank you for your patience :-)

Choc Chip Macadamia Cookie

I made this cookies for the Masak-masak challenge #4 since it has been in my to-do list recently. The original recipe is by Gina from KC, you can get it here but as usual, I change it slightly to suit my taste ;-)


Ingredients
115g salted butter
180g Self Raising flour
1 1/2 Tbsp cocoa powder
80g castor sugar
50g light brown sugar
1 egg, lightlybeaten
pinch of salt
1 tsp vanilla essence (optional)
1 1/2C semisweet chocolate chips
1/2C macamdamia, toasted and chopped

Method
1. Cream butter and sugar till creamy
2. Add egg and mix till well blended
3. Add in flour, cocoa powder, chocolate chips and chopped nuts and mix it gently
4. Chill the dough for about 15-30mins to set it
5. Scoop with a spoon or cookie scoop and line them in a lined tray
6. Bake in a preheated oven 170C for about 15-20 mins
7. Cool on a wire rack before storage

Enjoy!

Wednesday, August 13, 2008

Focaccia Garlic Cheese Toast

This was inspired by the focaccia cheese toast we had at madjacks a couple of weeks ago. My other half has been bugging me to make it for him. So I made this earlier for dinner to satisfy his cravings *LOL*


This is really easy to make. I used store bought focaccia for as I didn't have time to make one yesterday.

Ingredients
1 9" herb focaccia sliced into 2 layers (or whatever size that you fancy)
4 slices chicken ham (optional)
Garlic spread (homemade or store bought, I made my own using fresh garlic & parsley)
Cheddar/mozarella cheese, shredded

Method
1. Spread garlic spread/butter on focaccia
2. Place 2 slices chicken ham on each of the bread
3. Sprinkle generously with cheese
4. Bake in a preheated oven 200C for 15mins or till the cheese turns brown
5. Serve hot

Enjoy !

Saturday, August 09, 2008

Happy 43rd Birthday Singapore !!!

Today 9th August 2008 is Singapore's 43rd birthday. Had a small gathering at my parent's place earlier and decided to make this simple cupcake cake for the kids and my mom *LOL* My mom loves eating cake. Sorry for the ugly decor as I was rushing for time. The crescent didn't come out nice *sob sob*


To all Singaporean, have a wonderful holiday!

Thursday, August 07, 2008

Spicy Beef Kimchi Stew

I still have some old kimchi left in the chiller and looking for ways to use them other than eating it with rice *LOL* I love beef and kimchi, so I happened to find a kimchi stew in the internet and oh it's so delicious.


The original recipe can be found here. I made some minor changes to it and it came out perfect for me.

Ingredients
100g sliced beef (stir-fry type)
1 Tbsp sesame oil
3 small clove garlic, chopped
2C kimchi, chopped
1 Tbsp gochujang
1 Tbsp chilli peppers
1 Tbsp soya sauce
1 tsp sugar
4-5C water/stock
1 cube chicken stock (omit this if you use stock to replace water)
chinese tofu/silken tofu
a bunch of spring onions

Method
1. Saute beef in 1/2 Tbsp sesame oil for a few minutes
2. Add kimchi and stir-fry for about five minutes, then add remaining oil and garlic
3. Add water/stock into the pot, then add gochujang, chilli peppers and soya sauce and bring it to a boil
4. Add chicken stock (if using) and sugar and let it simmer for about 15-20mins
5. Add tofu and then spring onions at the very end
6. Serve hot with rice

Masak-masak challenge #3

This is the 3rd challenge and we have to use the following ingredients:

  • puff-pastry
  • meat
  • fruit (in the food or part of the meal)

Since my kids and hubby love pizza, I decided to make this simple finger food, Puff-pastry Pinwheel Pizza.


It's really easy to make, you need:

Puff-pastry (store bought or homemade)
Pizza sauce
Pineapple & tuna for the toppings (you can use your fav toppings)
Grated mozarella & cheddar cheese

You need to roll out the pastry into a rectangle, spread the pizza sauce, sprinkle pineapple and tuna and lastly sprinkle generously with cheese. Roll it like a swissroll and cut into pieces. Place them in a tart casing (can be a bit messy) and sprinkle more cheese. Bake in the preheated oven, 180C for about 15mins or till the pastry puffs and turn golden brown.

Easy peasy ! *LOL*

Wednesday, August 06, 2008

No-bake Chocolate+Banana Cheesecake

This was done for a masak-masak challenge. I married a couple of recipes and made some changes to them and this is what i made ;-)


Crust
Ingredients
200g crushed digestive
120g butter, melted
1-2T sugar (you can omit this if you don't like sweet)

Method
1. Combine the digestive crumbs and sugar
2. Add melted butter and blend well
3. Press onto the bottom and up the sides of an lined 9inch springform pan or a pie plate and refrigerate for at least 30 minutes


Filling
Ingredients
250g cream cheese
1/2C sweetened condensed milk (you can add more if you like sweet)
100g whipped cream (you can use frozen whipped cream too)
1T gelatine
2T water
1-2 bananas, sliced (more if you like)
70g dark chocolate
70g dairy/non-dairy cream

Method
1. Heat up dairy/non-dairy cream, add dark chocolate, stir to melt it and put aside
2. Soak gelatine in 2T of water till it blooms and heat it up in the microwave to dissolve it, put aside
3. Beat cream cheese until fluffy then add add condensed milk, blend it well
4. Fold in whipped topping, add gelatine and gently fold it in
5. Take the crust out of the refrigerator and pour chocolate mixture and spread it to cover the crust
6. Arrange banana slices over the chocolate
7. Pour the cream cheese mixture over and chill till firm

Enjoy !

Monday, August 04, 2008

Masak-masak challenge #2

This is the second masak-masak challenge and the challenge was to create a dish not more than $10 and it has to include the following:

  • Protein (meat/fish)
  • Carbohydrate (rice or noodle)
  • Vege/Fruit

So I came out with this Assam Laksa ! My version wasn't really satisfying as I would like to as the main ingredient, torch ginger was not used because I could not find it !! It's really frustrating when you do not need the ingredient, it is like all over the place and when you need it, it seems to have dissappeared :-(


Masak-masak challenge #1

We had a masak-masak (cook) challenge at one parental forum that I frequent and the first challenge was to cook or bake something that has the following ingredients:

  • Cheese
  • Chocolate
  • Fruit

So I came out with this


Sorry about the picture, I could not get a nice decent photo of it *LOL*

Lemak Daun Turi (Turi Leaves in Coconut Milk)

Apologies about the late update. I have been tied down with the kids activities and also lack of mojo to update what I have done over the couple of months. Back to the topic, I made this typical malay dish after seeing my hubby's lunch at Hjh Maimunah, a very popular restaurant that serves very traditional Malay dishes. Traditional dishes is something that I hardly cook at home simply because they can be easily found outside and hubby prefers to eat something different at home. But because we were heading to HKG for our holiday, I don't want to feel homesick with some local dishes *LOL* So I made this with some simple side dishes.


This is a very simple dish, no need to sautee anything, you just need to blend the ingredients and boil them. They are many ways to cook lemak, some add lemongrass for fragrant and chillies for spicyness. I stick to the very basic as my kids love eating this too.


Ingredients
A bunch of turi leaves
1 or 2 medium sweet potatoes
1 large onion
3 small clove garlic
2 T ikan bilis (anchovies), soak
1/2cm belacan (shrimp paste)
1-2C coconut cream/milk
600ml or more water
salt to taste


Method
1. Pluck turi leaves, wash and drain
2. Grind onion, garlic, ikan bilis and belacan into paste
3. Skinned and cut sweet potatoes into medium size pieces and boil it in 600ml water
4. Once sweet potatoes are half cooked, add the ground paste and let it simmer, add water if it gets too low
5. Add coconut cream, stir and let it simmer (do not let it overboil)
6. Once the gravy starts to turn bubbly, add salt and turi leaves and leave it to boil, turn off fire and serve


What do I eat this with?


daun turi
you can learn more here

Tuesday, April 29, 2008

Egg White Brownie

I was searching for a recipe that uses egg white and this interesting recipe caught my attention. It was from an Indonesian website but forgetful me can't remember the url :-( With some egg whites that need to be clear and soon to be expiring baking chocolate, I got my butt off and made this for tea over the weekend. I like the result as it is pretty light although it tends to be slightly crumbly. I up the egg white as the original uses 5 egg whites.


The texture of the brownie


Ingredients
250gm dark/semi-sweet cooking chocolate
100gm oil (original uses melted butter)
2 tsp vanilla essence
100gm cake flour
220gm egg white (original uses 5 egg whites)
150gm sugar
80gm almond slivers, toasted
a handful of semi-sweet chocolate chips/nuggets

Method
1. Double boil or microwave oil and chocolate till the chocolate melted and let it cool
2. Sift flour into chocolate mixture and stir gently till well combined and add vanilla essence, put aside
3. Beat egg white till bubbly and slowly add sugar bit by bit and whip till stiff peaks
4. Take 1/3 of the egg white and mix it gently with the chocolate mixture
5. Stir in mixture into the balance 2/3 egg white and gently mix till well combined
6. Add half of the almond and stir
7. Pour mixture into a 8x8 pan that has been lined and greased
8. Top batter with remaining almond and chocolate nuggets and bake in a 180C preheated oven for 35-50mins (depending on your oven) or till brownie is cooked (do not overbake as it will get too dry and crumbly)
9. Once baked, leave brownie in the pan for 5-10mins before removing and cooling it on the rack

Enjoy !!

Saturday, April 12, 2008

Easy Chicken Cream Macaroni

I would like to apologize for the late update :-( I have been busy with my kids schedule and my sideline so much so that I could not find time to update this blog. Thank you for all your patience.

Eversince we engaged a helper, I seldom cook in the evenings. Hubby has complaining that he misses my fusion, easy dishes .. so sweet of him. So since the girls and daddy likes baked pasta, I made this for lunch a few weeks ago using the campbell cup soup.


The soup that I used


This one is less salty as compared to the canned ones. I used all the 3 sachets for a 500g pasta (uncooked).

Ingredients
3 sachets cream of chicken instant soup (1 box)
500g macaroni, cooked till al-dente and drain
1 small clove garlic, chopped
10-15 medium size prawns, de-shelled
2tsp olive oil
1.5C - 2C water
Mix of mozarella and cheddar cheese
some mix vege (optional)

Method
1. Heat oil, add prawns and cooked till the prawns turned orangy, removed and put aside
2. Fry chopped garlic till lightly browned and add water, stir
3. Stir in cream of chicken instant soup and keep stirring till well-blended using a whisk
4. Once the soup bubbles, add the prawns and mix vege if you are using stir then add the macaroni
5. Stir everything till all blended
6. Pour macaroni into a casserole dish and sprinkle it with cheese
7. Bake in a 190C preheated oven and baked for about 20mins till the cheese turns brown and bubbly
8. Serve hot with salad on the side

Thursday, March 06, 2008

Baked Corned Beef & Cheese Springrolls

This was featured in Berita Minggu (our local malay paper) a few weeks ago. An easy snack, good if you have a can of corned beef and you do not what else to do with it *LOL*

I baked the springrolls instead of deep frying them - trying to be a little bit healthy.


Ingredients
1 can corned beef, mashed (I like using Hormel brand)
250g cheddar cheese, cut into strips
a few fresh green chili, sliced and remove seed
enough springroll skin
enough oil for brushing or melted butter
cornflour mixture, for sticking springroll skin

Method
1. Take 1 piece of springroll skin and put a tsp of corned beef on it
2. Put cheese slices and chili slices on top of the corned beef and roll springroll
3. Repeat 1-2 till you have used up your springroll skin and corned beef
4. Arranged springrolls on a lightly greased baking tray
5. Brush springroll with oil and bake in a preheated oven (about 180C) till skin turns golden brown about 15mins
6. Turn over springroll after 5-10mins
7. Serve hot with dipping sauce

Wednesday, February 27, 2008

This is how I eat my instant noodle

Instant noodle - good or bad? I eat instant noodles occasionally likewise my kids. Sometimes when I am just too lazy to cook or have no idea what to eat, instant noodle is my answer *LOL* Who doesn't love the salty, msg laden soup that accompanies the springy noodles which can be prepared in under 5mins? Now, there are msg-free instant noodles available which we stock up for our lazy days and late night light supper.


Vegetables, fishballs, fishcakes, prawns, meat slices etc are usually added to the noodles to turn it into a more wholesome meal. If I run out of veges to add, I will dump a handful or two salad mix into the bowl then pour the hot noodle onto it. Very satisfying and healthy I should say *LOL* This is inspired during my trip to Vietnam as this is how they eat their noodles, always accompanied with a plate of fresh veges and lime slices .. This is how I usually eat my noodles.


Thursday, February 21, 2008

Mango Mousse Cake

I made this for my hubby last year, his 35th year mini celebration but didn't have the time to upload until today. It's a simple mango mousse cake with sponge base. I didn't bake the cake specifically for this cake but used my leftover sponge cake that I had.


A slice of the cake


This recipe is adapted from Rock Melon Mousse cake shared by Lucy (auntyyochana). I replaced the rock melon with mango because that is the only thing i have with me. I will only share the mousse recipe. For the base, you can use any sponge cake bought or made and put a layer before pouring the mousse over.

Ingredients
Mousse
200g mango puree
1 Tbsp gelatine powder + 50g water (soak together for about 5 mins)
2 egg yolk
30g sugar
150g Non-dairy whipped cream
Some chopped mangoes

Method
1. Boil mango puree and sugar together till boiling , take off from the heat
2. Add in egg yolks to the puree+sugar mixture and stir till smooth
3. Put back onto stove and then add in gelatine mixture and stir till dissolved
4. Leave to cool till lukewarm
5. Add choppped mango and fold in whipped cream
6. Pour on top of chocolate sponge cake and leave in the refrigerator to let it set
7. Serve chilled

Nice matters ...


Thanks maya from http://maya-kitchenette.blogspot.com/2008/02/nice-matters-award.html for this.

I would like to pass this award to:

playing with my food
bakingmum

Monday, February 18, 2008

Tuesday, February 12, 2008

Hokkaido Milk Loaf

This has been in my to-do list for quite sometime until I decided to bake it 2 weeks ago. It got lots of good reviews about it being soft even after 2 days and I have to vouch that because it is still soft even after 3 days !

Photobucket

Photobucket


The recipe is taken from here but I changed it slightly by adding more cream and reducing a little bit of the milk. This bread uses cream to replace the fat in butter/oil and I used my breadmachine to knead the dough for me. This recipe yields quite big loaf. You may want to make sure that the pan you have is big enough.

Ingredients
1 egg, lightly beaten
220g fresh milk (original is 250g)
180g whipping cream (heavy cream) (original is 150g)
9g salt
80g sugar
540g bread flour
60g cake flour (high ratio flour)
30g milk powder
10g instant yeast

Method

1. Put the ingredients to the breadmaker pan according to the list
2. Select dough function and let the machine knead the dough
3. Once the machine beeps, take the dough out onto a lightly floured table and punch it down
4. Shape the dough into a rectangular shape using your hands (try not to punch too much air out)
5. Roll it out into a swissroll and place it in a butter pan and leave it to rise till double in size
6. Brush the bread with milk or egg wash and bake in a preheated oven at 170C for about 40mins

Friday, February 01, 2008

Homemade Chicken Sausages

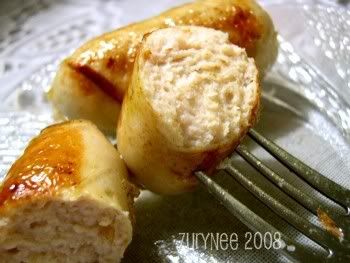
I finally made my own sausages!!!! Yay!! I have been wanting to make them for quite sometime but had a hard time looking for halal casings. After checking locally and the internet, I finally got it! Honestly, this is a pretty expensive sausages because I had to order the casings from Europe. But it's all worth it though. My family can enjoy their sausages free from preservatives and God knows what else they dump into it.


Here is the picture of the sausages I made
Photobucket


I didn't have the sausage stuffer so at first I tried using the funnel but give up halfway. It's too time consuming! I bought myself a cheap piping decoration set (will update photo later) as a backup and true enough, it was easier using that! After the stuffing, I left the sausages in the fridge overnight.

My stuffed raw sausages

Photobucket

After which, I steamed them for about 10-15mins.

The cooked sausages (the meat turns white)

Photobucket

Then they are ready to be pan-fried either with butter or oil (I used olive oil).

Here is my simple trial chicken sausage recipe.

Note: For those who do not have the casing, you can use a plastic wrapper and shape the sausage mixure into a sausage. Tie the ends with kitchen string, leave it overnight in the fridge and then boil it till the meat cooks through and remove the plastic wrap before grilling/pan frying it. I haven't tried it personally but this is what I have read in some sausage recipes.

Ingredients
300-400g chicken fillet
1 medium onion
2 clove garlic
1 tsp garam masala
salt & pepper to taste
Enough sausage casings

Method
1. Blend all the above ingredients will paste like
2. Stuff the casings with carefully not to overstuffed them
3. Twists the filled casing into portions
4. Rest sausages in the fridge overnight
5. Steam the sausages
6. Once cool, you can freeze it or pan fried/grill and enjoy !


Tuesday, January 29, 2008

Pineapple Tarts

Photobucket


Pineapple tart is a must in almost every household during festive seasons. For us, we like melt-in-your-mouth pastry and we have been using this recipe for a very very long time :-) The original recipe uses icing sugar, but we omit that as we don't like overly sweet tarts. For the pineapple paste, you can either make it yourself or buy it. When I am too busy or lazy, I usually buy the paste from baking supply store and modify it according to my liking. Cuts short the time.

I would recommend those who wants to do it to stick to 1 recipe. I have tried halving it and honestly, it didn't come out as good. I usually make kuih makmur with the same dough. So 1 recipe gives me 2 kinds of cookie. Hope you enjoy doing it as much as I have.

Ingredients
Pastry
500g butter, softened
700g plain flour
100g milk powder
100g icing sugar (I omit this but you can add if you want)
1/2 tsp salt
1 egg
2 yolks
1 tsp vanilla essence (optional)
a few drops of yellow colouring (optional)

Method
1. Cream butter, icing sugar if using and eggs till creamy and light
2. Add vanilla essence and yellow colouring (if using) and mix well
3. Add flour, salt and milk powder into butter mixture, using your hand mix it till all the ingredients are well incorporated
4. Shape dough into a big ball, wrap and let it rest for 15min or more in the refrigerator
5. Shape the dough to your liking and top or fill with pineapple jam
6. Bake in a preheated oven at 170C for about 10-15mins or till the sides turn golden brown

Important Note
* For melt-in-your mouth effect, it is very important that you do not overmix or overwork the dough. Once the ingredients comes together, stop.

This dough is a little sticky, I usually clip it myself instead of using the mold. If you are using mold, make sure that you flour it a little but not too much to prevent sticking.

This is for evie, I got this recipe from the internet but can't remember the site. When I make my own filling, I don't have exact measurement. It's more of estimation but generally it is similar the one below but I omit the clove and star anise because I don't like the filling with spices :-)

Ingredients
Filling
4 sweet fresh pineapples (about 1 kg total weight) or crushed canned pineapple
600 g granulated sugar (you can adjust this according to your level of sweetness)
4 cloves
1 star anise

Method
1. Grate pineapples and squeeze out juice using a muslin cloth or use the strainer to drain the juice, keep aside
2. Chop or blend pineapple meat until fine
3. Combine with sugar, star anise and cloves in a heavy-bottomed pot and cook over low heat until almost dry
4. Stir constantly until mixture is gluey and thick, the consistency of thick jam
5. If too dry, add abit of pineapple juice
6. Cool and store in refrigerator