Showing posts with label Snacks. Show all posts

Friday, September 12, 2014

Easy Apple Galette

I had a bunch of apples at home and running out of fridge space to keep them.  Ended up making this easy apple galette to get rid of some of them.   Other than the pastry that needs a recipe, the filling is simply by estimation.  


I used flan pastry for this galette because it is the easiest and less fragile.

What you need:

Flan Pastry (adapted from Michel Roux Pastry)
250g pastry flour (original using plain flour)
125g butter, diced and slightly soften
1 egg
1 tsp caster sugar
1/2 tsp fine salt
40ml ice water

1. Pour flour into a big bowl and make a well
2. Put butter, egg, sugar and salt in the middle, mix and cream the ingredients with you finger tips till it become like breadcrumbs
3. Add cold water and mix it until dough begins to hold together
4. Using palm of your hand, push the dough away 4 or 5 times until it is smooth
5. Roll pastry into a ball, cling wrap it and refrigerate at least 30mins or until ready to use


Apple Filling
3 medium size apples, skin removed and sliced
1/4 cup brown sugar (adjust accordingly to your liking)
1.5 tsp ground cinnamon (adjust accordingly)
some butter

1. Mix everything except butter and put it aside

What you do:

1. Roll the pastry to about 0.5cm or thinner
2. Pour the filling in the centre of the rolled pastry
3. Cut butter into small pieces and put on top of the filling
4. Fold the edges and brush it with egg whites if you want
5. Bake in the 180C preheated oven until the edges turn golden brown
6. Once slightly cool, sprinkle with confectionary sugar and serve warm on it's own or with ice-cream or cream


Thursday, June 26, 2014

Skillet Smores

Small treat for the girls over the weekend with my stash of dark chocolate in the refrigerator.  Got this idea from pinterest (where else :D) and I thought it was cool to have it done for the girls.  So with my medium size skillet, good dark chocolate bars plus some leftover bittersweet chocolate chip cookies, they had a great time munching this after lunch.  I partially melt the chocolate for a bit in the oven before I arranged the marshmallows on top.  Then put it on grill in the oven till the marshmallow turns brown.  We had it with soda crackers instead as we don't have graham crackers easily available here.  The combination is wonderful!  


What you need:
2 bars or more of your favourite chocolate
1 bag marshmallow
crackers

What you do:
1. Break the chocolate and heat the skillet in the preheated oven till partially melted
2. Arrange marshmallows on top of the choc
3. Put the skillet back to the oven and let the marshmallow browned, serve with crackers


Tuesday, June 24, 2014

Vietnamese Yogurt (drink)

I make my own yogurt at home using my yogurt maker and cultured powder, once a few weeks. They are usually made with low and full fat milk and quite recently with coconut milk.  I usually eat it on its own or use it for my bakes and cooking.  A few days ago, I chanced upon a recipe of a vietnamese yogurt that uses sweetened condensed milk.  Very interesting I should say and that made me wanted to try. The recipe I chose uses yogurt as a starter, curious with the taste, I made it 2 days ago.  Unfortunately my low-fat yogurt is not potent enough to firm up the yogurt nicely but I really do like the taste.  Instead, I have myself a yogurt drink that tastes very much like Yakult *yummy*


Next time I will use the powder instead and replace some of the water with full cream milk.

I used my yogurt maker for this, but you can use your oven to set the yogurt.  Best to do it at night so that it will be ready by the next morning.  Recipe follows:

What you need:
1 can sweetened condensed milk
1 can boiling water (use the same can of the condensed milk)
1 can room temperature water (use the same can of the condensed milk, original recipe uses 2 cans)
1/2 cup yogurt (store bought is fine)

What you do:
1. Pour condensed milk into a bowl, add boiling water and stir the mixture
2. Add room temperature water and stir till well blended and let the mixture cool a little bit (you do not want it to be too hot when adding the yogurt as it will kill the bacteria and your yogurt will not set)
3. Add yogurt and stir
4. If you are using a yogurt maker, pour mixture into your yogurt maker and let it set in the maker till it sets
5. If you are using the oven, preheat the oven to 75C then turn it off the heat
6. Pour the yogurt into small containers and place them in the oven with the light on overnight.
7. Yogurt is ready for consumption the next day.  Keep some yogurt to be used as a starter for the next batch

Happy trying !

Thursday, June 05, 2014

Juicy Lucy Cheeseburger

One of those weekends when you do not know what to prepare for lunch.  Then the hubby requested for a burger after he saw a photo of the juicy lucy burger done by his cousin. So since I am in the mood to be busy, I made this for lunch. Mince the meat using my grinder and baked the burger buns - everything from scratch .. well almost everything :)
You know I always go for easy recipe and this is easy. Very minimal seasoning required. 

This is how we had it, with potatoes and sweet potato chips.


Here is the link to the recipe I used for the patty.

http://www.food.com/recipe/jucy-lucy-cheeseburger-383042

What you need:
1 kg ground beef, chilled
1 tbsp Worcestershire sauce
2 tsp garlic powder
150g a mix of cheddar and mozarella cheese cut into 1cm cubes
kosher salt
ground black pepper

What you do:
1. Place beef, Worcestershire sauce, garlic salt, and pepper in a bowl; mix well, portion into eight (size of lemon)
2. Flatten the the beef and stuffed the cheese into the patty
3. Preheat a cast-iron skillet or heavy-bottomed pan to medium heat
4. Cook burgers over heat 3 to 4 minutes on first side (Burger may puff up due to steam from melting cheese. This is normal. Do not be alarmed)
5. Flip, and using toothpick, prick top of burger to allow for steam escape. Allow burger to cook 3 to 4 minutes on this side.
6. Remove patties from pan or grill, place them on the burger bun, add some condiments on, and ready to be eaten

Enjoy !

Quick Rise Yeasted Rolls

I was thinking of baking bread but not in the mood to do something that takes hours. So tried this recipe because of the rave reviews. It also doesn't use huge amount of yeast considering this is a quick rise roll. Verdict: really good. Soft and delicious.


I made minor changes. Refer to the link for the original recipe. Mix the dough till slightly stretchy before the first rest. No need to knead. The dough I got was soft but manageable.  This rolls also keep well, they still stay soft the next day.

http://m.allrecipes.com/recipe/13827/quick-yeast-rolls

Quick Rise Yeasted Rolls
What you need:
2 tablespoons olive oil
2 tablespoons raw sugar
1 cup hot water
7g instant yeast
1 egg, beaten
1 teaspoon salt
2 1/4 cups all-purpose flour

What you do:
1. Preheat oven to 220 degrees C
2. In a large bowl, mix the oil, sugar, and hot water
3. Allow to cool until lukewarm, and mix in the yeast until dissolved
4. Mix in the egg, salt, and flour, allow the dough to rise until doubled in size.
5. Divide the dough into the prepared muffin cups or tray, and allow to rise again until doubled in size.
6. Bake for 10 minutes in the preheated oven, or until a knife inserted in the center of the bread comes out clean.


Tuesday, February 25, 2014

Chocolate sponge with cream cake

I made this cake for my youngest daughter's 7th birthday last November as she requested for a simple cake for her birthday.  Initially she wanted to share it with her friends but changed her mind at the last minute.  Her sisters and herself got to enjoy this cake all by themselves :)


This is pretty much a versatile cake. I chose to use peaches because my kids love them.   The recipe is adapted from the book 'Dessert's Tempation, Wendy's Delights'.  I would recommend that you use a very good quality cocoa powder.


What you need:
(A)
20gm cocoa powder
60ml hot water

(B)
100g superfine flour/cake flour
1/2 tsp baking powder
40g caster sugar

(C)
30g melted butter/oil
4 yolks
30ml milk

(D)
4 whites
40g caster sugar
1/6 tsp cream of tartar (optional)

1 can peaches, strain and keep the syrup
150g whipping cream (more if needed), whipped till stiff

What you do:
1.Mix cocoa powder and water until mixture turns into paste like
2.Sift flour and baking powder together then add sugar, mix well
3.Pour melted butter, yolks, milk and cocoa mixture into dry ingredients and stir with a whisk
4.Beat egg whites, sugar and cream of tartar until stiff peaks form.
5.Add half of egg white at a time to (3), fold gently after each addition
6. Pour batter into a greased 8 inch cake tin and bake at 180C for 30-35mins

To assemble
1. Cut cake horizontally into 3 layers
2. Brush layer with the syrup
3. Spread cream on each layer and arrange peaches on top.
4. Place another layer and repeat (3) until the last layer, cover the whole cake with the balance cream
5. Decorate accordingly

Chill before serving.


Thursday, February 20, 2014

Oreo Mini Donut

So I bought a 7-hole donut maker last year and kept it in the storeroom for a couple of months before I decided to use it recently.  This is one of the makers that I have bought and I still have another one which I have yet to open and try :-P

Anyways, since i got bitten by the baking bug BUT a tad bit lazy to use the oven, I took the opportunity to use this instead.  So this is how it looks.  I can honestly say that I really like this gadget.  Great to prepare fuss-free snack for the kids.  


I bought a mini-donut book recently 'Mini Donuts' by Jessica Seggara.  I would say the recipes are pretty good and simple to make.  The first recipe I tried was this Oreo Donut.


You can see the naked donuts and after the makeover.  The kids love them and with the fact that it is bite-size, it was easy for them to pop it into their mouth :-D.

What you need:
Donut
1 1/3 C all purpose flour
1/2 C cocoa powder (use good quality cocoa powder)
1/4 tsp salt
3/4 C sugar
1/4 C yogurt (original uses sour cream)
1/2 C milk
1 large egg
3 Tbsp vegetable oil or melted butter
1 tsp vanilla

Icing
1 1/2 C powdered sugar, sifted
1 tsp vanilla
1/2 Tbsp heavy cream
some chopped oreos

What you do:
Donut
1. Whisk egg and sugar till fluffy, add the other wet ingredients except milk and mix them till well blended
2. Sift all the dry ingredients and add into (1) alternate with milk ending with dry ingredients
3. Mix till there are no lumps
4. Preheat the donut maker and fill the indentations 3/4 full and bake according to the manufacturer's instruction

Icing
1. Mix all the ingredients till you get a thick consistency.  If mixture is too thick, add additional milk/cream 1 tsp at a time till you get the consistency to your liking
2. Dip each donut into the frosting and sprinkle some chopped oreos.  Let the frosting set before serving

Enjoy !


Tuesday, January 17, 2012

Keropok Lekor


This is my husband's favorite snack and he never gets tired eating it *LOL*. Keropok lekor tastes very much like fish keropok but it is shaped like a sausage. There are 2 types, one is chewy and the other is really crispy to a point like eating sticks *lol*. You will usually need to cut them into pieces before frying. I decided to give it a try over the weekend and fortunately they came out nice :) For this, I used the saba (mackeral) fillets that you can get from the supermarket, usually prepacked in 400g package. Otherwise, you can get fresh ones and get the fishmonger to fillet them for you. I get about 8 sausage pieces with this recipe.


Thursday, November 24, 2011

Quick/Rough Puff Pastry


I was in the mood to bake something crispy and buttery. So what came into my mind was puff pastry. I was not prepared to do the classic pastry as it was a weekday night. Found one by Gordon Ramsay which is easy as it uses 1 block of butter (250g/9oz). Since most of the butters we get here is in 9oz or 250g, I love love recipes that uses the whole lot as I can be lazy to cut and weight it *LOL* This is extremely buttery so eat it with care if you are concern with your weight :-D Do make a bigger batch and store them in your freezer as it is definitely better than store bought ones (at least the ones we get here).


What you need:
250g strong plain flour (bread flour)
1/2 tsp fine sea salt
250g cold butter , cut into cubes
about 150ml cold water

What you do:
1. Sift the flour and salt into a large bowl.
2. Add 1/4 of the butter and rub them in loosely into the flour either using a food processor, hands or pastry blender (I used pastry blender)
3. Add the balance 3/4 butter and mix them lightly, it is important to have chunks of butter in the dough
4. Make a well in the bowl and pour in about 100ml of the cold water, mixing until you have a firm rough dough adding extra water if needed. Cover with cling film and leave to rest for 20 mins in the fridge.
5. Turn out onto a lightly floured board, knead gently and form into a smooth rectangle. Roll the dough in one direction only, until 3 times the width, about 20 x 50cm. Keep edges straight and even. Don't overwork the butter streaks; you should have a marbled effect.
6. Fold the top third down to the centre, then the bottom third up and over that. Give the dough a quarter turn (to the left or right) and roll out again to three times the length. Fold as before, cover with cling film and chill for at least 20 mins before rolling to use.


Note:
1. The reason why you need to have the butter in chunks because we need the steam coming from the butter during baking to lift the dough so that you get the layering effect.
2. When rolling, if you find the dough gets a bit soft, chill it in the fridge for 15mins and continue with what you were doing.
3. If you want a more distinct layering, do not roll the pastry too hard.

Tuesday, July 12, 2011

Calzone wannabe :-)


I made pizzas for dinner the other day and had some of the toppings ingredients left but not the dough. Fortunately, I had some instant pratas stashed in the freezer and used it to make these. Easy and delicious I must say *LOL*


What you need:

A few prata skins, enough to use up the pizza topping ingredients
chicken ham or whatever cold meats that you like
shredded cheese
pizza sauce
egg wash (optional)


What you do:


1. Remove the plastic from the prata skin (make sure the prata is not too soft as it will be difficult to handle)
2. Spread pizza sauce to half of the prata skin
3. Add chicken ham, shredded cheese
4. Fold over the other half of the prata and press the ends either using the fork or just crimp it a bit with your fingers and egg wash the skin
5. Arrange on lined baking tray and bake in a preheated oven 180C for about 20-30 mins or till the prata skin turns golden brown - you may need to bake a little longer in a slightly lower temperature if you want to have crispy skin.
6. Serve it piping hot

Thursday, June 23, 2011

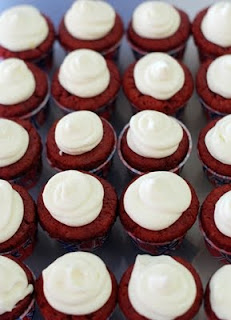
Red Velvet Cupcake

I don't usually eat cakes that are heavily coloured, hence it took me a very long time before I decided to make these delicious cupcakes. Thanks to Chuck Hughes, after watching one episode of 'Chuck`s Day Off', I could not get this out of my mind. So I finally caved in and made these. They are very easy to make and delicious especially the mascarpone frosting. Do give it a try!


You can get the original recipe from here: http://www.foodnetwork.ca/recipes/Dessert/recipe.html?dishid=11309


Cupcakes
Ingredients
2 eggs (60g each)
1 1/2 C sugar
1 1/2 C canola oil
1 C yogurt, plain
1 tsp Wilton no-taste red gel (original is 2T red food coloring)
1 tsp vinegar
1 tsp vanilla essence
2 1/2C cake flour (original recipe uses plain flour)
1T cocoa
1 tsp baking soda
1 tsp salt

Method
1) Preheat oven to 180 °C
2) In a food mixer/processor, mix the eggs with the sugar, oil, yoghurt, food coloring, vinegar and vanilla. Add flour, cocoa, baking soda and salt. Blend until just incorporated.
3) Place cupcake papers into a muffin pan, divide the batter in the cupcake papers, pour only halfway so batter doesn’t overflow, and bake, rotating half way through, for 25 to 30 minutes. Remove and let cool.


Icing
Ingredients
1 tub mascarpone (500g,original recipe uses 2C mascarpone)
1C icing sugar, sifted
1/2C cream
Zest of 1 lemon

Method
1) In a bowl, beat the mascarpone, icing sugar, cream and lemon zests together until the mixture is smooth.
2) Spoon a dollop of mascarpone cream on the cupcakes.

Tuesday, February 15, 2011

Fragrant Fried Pancakes


It was one of those days where I wanted to try making something a little bit different. I had quite a stash of scallions and sesame seeds and happened to find a recipe that uses both. It is pretty easy to make and lovely to eat it on its own or dip it with some thick gravy like curry, stew or even chilli dip.


This recipe is taken off the book Dim Sum Kitchen by Tan, Melody. I just estimate the amount for the spring onions, sesame seed and salt.

Ingredients
250g All purpose/Plain flour
100g boiling water
10g warm water
4g instant yeast (dissolve into 2T warm water)
5g spring onion
2.5g sesame seed
5g salt
vegetable oil for pan frying

Method
1.Dice spring onion and put it aside
2. Pour flour into basin/bowl and add 100g boiling water and stir till flour is like bread crumbs
3. Dissolve yeast in abit of warm water about 2T
4. Once yeast started to bubble add to the flour and add another 10g warm water, spring onion, salt and stir
5. Cover with cloth for an hour and then knead again
6. Roll into into pancakes about 0.5cm thickness and sprinkle sesame seeds on both sides
7. Heat pan and add oil, pan fry on medium heat
8. Flip when one side turns golden brown and fry till it turns the same colour.
9. Remove, cut into small pieces and serve.

Friday, March 05, 2010

Panini/Sandwich

We have sandwich dinner at least once a week. Usually it will be on nights where my eldest daughter has her tuition at home. My kids are bread eater and they always looking forward for sandwich dinners. Their favourite is Tuna although we will have cold meat slices which is not very often though. While the girls are happy with their soft bread, the hubster likes it grilled like this.


A simple and cheap panini presser is not easy to find here in Singapore. However, a friend recommended me this particular brand which is affordable and large enough to fit at least 2 sandwiches. This is the presser/grill that I got last year and I simply love it. Although I bought a philips cucina with changable plates earlier for my paninis, that is now used strictly for my waffles *LOL*


Oh I forgot to mention, the brand is Princess.

Sunday, October 18, 2009

Tuna melts

My kids love this, an alternative to the old boring tuna sandwiches that they usually would have on days when I am super lazy *blush* It is extremely easy if you buy all the ingredients from the wrap to the shredded cheddar cheese *LOL*


Ingredients:
Tortilla wraps
Canned tuna or whatever filling that you like
Shredded cheddar cheese

Method:
1. Heat pan
2. Place one wrap on the heated pan let it warm up
3. Spread some filling to on side of the wrap
4. Sprinkle cheese and leave it for a minute, once you see some of the cheese starts to melt, fold over the wrap
5. Press it lightly so that the edges will stick
6. Flip it over to heat the other side
7. Serve it warm with ketchup or chilli sauce

Enjoy !

Thursday, June 25, 2009

Sardine with chillies

I don't know what to call this dish. This is my all-time favourite easy meal. However, I cannot make this very often because my hubby is prone to gout. My dad used to make this when we were young and I think his tastes better than my mom's *lol* We usually make this when we have plenty of bread (to get rid off) or when mom's not cooking. I love to have this with french loaves .. yummy.

I know that some people don't like sardines because of the smell. I love sardine including the smell *LOL* but adding freshly squeezed lime juice is a good way to get rid of it (be generous). Chillies are optional if you don't like spicy, but for me personally it will not taste as good without them.


Ingredients:
1 tall can sardines, mashed (I like Ayam brand)
1 japanese cucumber, cut into small cubes
1 medium red onion, sliced thinly or cut into small cubes
2 red fresh chillies, thinly sliced, remove seeds if don't want spicy (optionally)
juice from 10 small limes (or more)

Method:
1. Mix them all up

Dump everything on the mashed sardines


Lovely juicey limes


Serve this with hot french loaves .. or sliced bread if you like :-)


Tuesday, May 19, 2009

Easy crab meat patties

I got a pack of 500g crab meat in my freezer and it has been sitting there for quite a while. Inspired by a suggestion by a mom from a forum that I frequent about making patties with fish paste as finger food, I decided to give it a shot with crab meat instead. This is a simple dish with very minimal ingredients. You can use your favourite seafood meat and add more ingredients like mix vege to make it more wholesome.


I wasn't sure whether my kids would like it but surprisingly they finished it all :-) If you want a thicker coating, coat the patty with egg and breadcrumbs 2x before frying it. This will give the patty a nice thick, even coating that looks like those frozen patties you get at the supermarket. Do give it a try.

Ingredients
500g crab meat (you can use fish or cuttlefish paste or a mix of each of them)
2 medium potatoes, steam and mashed
1 egg, lightly beaten
1-2T corn flour or AP flour
salt & pepper to taste
enough oil for frying

(Coating)
enough breadcrumbs
egg, lightly beaten
flour

Method
1. Mix crab meat and mashed potatoes throughly
2. Season with salt & pepper to taste
3. Add egg and flour and mix till well blended
4. Shape into lemon size balls and flatten it to patties
5. Chill patties in the refrigerator for about 2hrs
6. Place breadcrumbs, egg and flour each into 3 individual plates
7. Heat up oil in the pan
8. Coat patty with flour, followed by dipping into the lightly beaten egg
9. Coat with breadcrumbs, dip into egg again and coat with breadcrumbs a second time
10.Fry patty till golden brown
11.Serve hot with lemon wedges

Enjoy !!

Friday, May 08, 2009

Easy Waffles

The hubby likes eating waffles with ice-cream, for me, I prefer to have it with jam/fruit preserves. Got this recipe from the manual that comes with the Philips snack maker and I like the fact that it is easier than the ones using eggs. This one uses whipping cream instead but you will still need to whip it till stiff to lighten the texture of this wonderful waffles. Surprisingly even without sugar it tastes real nice and crispy.


Ingredients

200ml ice cold water
200g plain flour
300ml double cream (or any other whipping cream you have)
pinch of salt

Method
1. Mix flour,salt and water
2. Stir till batter is smooth
3. Whip the cream until stiff
4. Mix the cream into the flour batter little at a time gently
5. Pour batter to the buttered waffle maker and cook as per the maker's instruction
6. Serve hot with toppings of your choice

Monday, April 06, 2009

Panini wannabe :-P

This talk about panini started in a parenting forum which I frequent and made me crave to have one. I love sandwiches but not those cold ones. If it is not hot, it has to be at room temperature *LOL* So all these talk about panini excited me but the problem is, it is not very easy to get a low price panini presser (even the over the stove kind would cost a lot more). There is one selling at departmental store but it costs a whopping S$300+ :-( So after doing my window shopping, I decided to get a multi-plate snack maker.


It has 3 interchangable plates and well it works pretty fine for me although you may have a problem with thicker sandwiches though. I started with something simple.


Egg mayo sandwich


Peanut butter+banana sandwich


So far I am pretty happy with this gadget. In fact I have made waffles and pocketed sandwiches with it. The waffles will be updated later ;-D

Wednesday, December 24, 2008

Fish+Prawn Wrap

When was the last time I did something that is quick & easy? I know, i know that I have not been posting much lately on quick & easy dishes *feeling guilty* Today, I am just about to do that.

Now I am back to the same routine like 2 years ago? I have to prepare dinner after work ever since I am now back to be helper-less *LOL* Got tired of eating rice and pasta, so came up with this wrap dish which is easy BECAUSE I CHEAT *LOL* I cheated by buying the fish finger and crunchy prawns from LJS (Long John Silver's). Actually I wanted to get the fish and chicken fillets but unfortunately they don't sell it individually now. How sad :-(


The salsa is actually a salad which I got the recipe from Sri's blog. You can get it here I left out the chilli flakes as my kids can't take too much spice.

This is how it's like before it's rolled up.


Here is the list of ingredients to make the roll. Only the salsa was made from scratch, the rest were store bought including the chapati. To cut short preparation, just make sure you prepare the salsa/salad ahead either in the morning or the night before.

chapatis, heat it as per instruction
fish fingers
crunchy prawns
japanese mayo
salsa/salad

Just dump the fish, prawns and salsa onto the chapati with a generous squeeze of mayo, roll it up and lead it to your mouth *LOL*

How easy can it get. Happy trying !!

Wednesday, August 13, 2008

Focaccia Garlic Cheese Toast

This was inspired by the focaccia cheese toast we had at madjacks a couple of weeks ago. My other half has been bugging me to make it for him. So I made this earlier for dinner to satisfy his cravings *LOL*


This is really easy to make. I used store bought focaccia for as I didn't have time to make one yesterday.

Ingredients
1 9" herb focaccia sliced into 2 layers (or whatever size that you fancy)
4 slices chicken ham (optional)
Garlic spread (homemade or store bought, I made my own using fresh garlic & parsley)
Cheddar/mozarella cheese, shredded

Method
1. Spread garlic spread/butter on focaccia
2. Place 2 slices chicken ham on each of the bread
3. Sprinkle generously with cheese
4. Bake in a preheated oven 200C for 15mins or till the cheese turns brown
5. Serve hot

Enjoy !